
Building RAG Applications with NVIDIA NIM and Haystack on K8s
Retrieval-augmented generation (RAG) systems combine generative AI with information retrieval for contextualized answer generation. Building reliable and performant RAG applications at scale is challenging. In this blog, we show how to use Haystack and NVIDIA NIM to create a RAG solution which is easy to deploy/maintain, standardized and enterprise-ready, that can run on-prem as well as on cloud native environments. This recipe is applicable in the cloud, on-premise or even in air-gapped environments.
About Haystack
Haystack, by deepset, is an open source framework for building production-ready LLM applications, RAG pipelines and state-of-the-art search systems that work intelligently over large document collections.
Haystack’s growing ecosystem of community integrations provide tooling for evaluation, monitoring, transcription, data ingestion and more. The NVIDIA Haystack integration allows using NVIDIA models and NIMs in Haystack pipelines, giving the flexibility to pivot from prototyping in the cloud to deploying on-prem.
About NVIDIA NIM
NVIDIA NIM is a collection of containerized microservices designed for optimized inference of state-of-the-art AI models. The container uses a variety of components to serve AI models and exposes them via standard API. Models are optimized using TensorRT or TensorRT-LLM (depending on the type of the model), applying procedures such as quantization, model distribution, optimized kernel/runtimes and inflight- or continuous batching among others allowing even further optimization if needed. Learn more about NIM here.
This tutorial shows how to build a Haystack RAG pipeline leveraging NIMs hosted on the NVIDIA API catalog. Then, we provide instructions on deploying NIMs on your infrastructure in a Kubernetes environment for self-hosting AI foundation models. Note that hosting NIMs requires NVIDIA AI Enterprise license.
Build a Haystack RAG Pipeline with NVIDIA NIMs hosted on the NVIDIA API Catalog
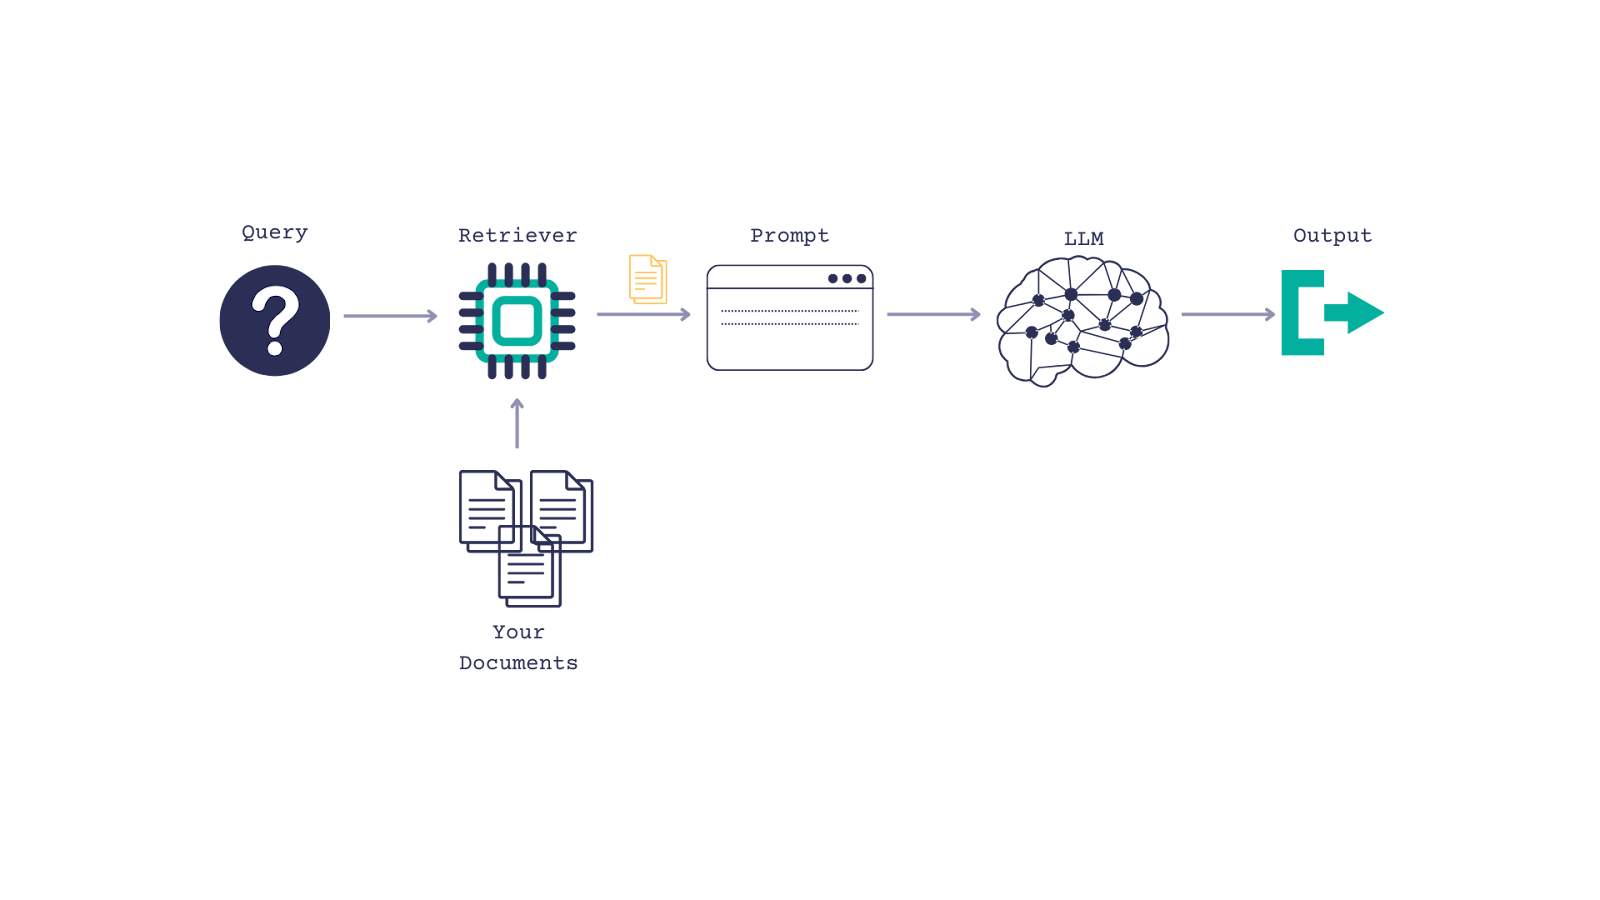
For RAG pipelines, Haystack provides 3 components that can be connected with NVIDIA NIMs:
- NvidiaGenerator: Text generation with LLM NIM.
- NvidiaDocumentEmbedder: Document embedding with NVIDIA NeMo Retriever Text Embedding NIM.
-
NvidiaTextEmbedder: Query embedding with NVIDIA NeMo Retriever Text Embedding NIM.
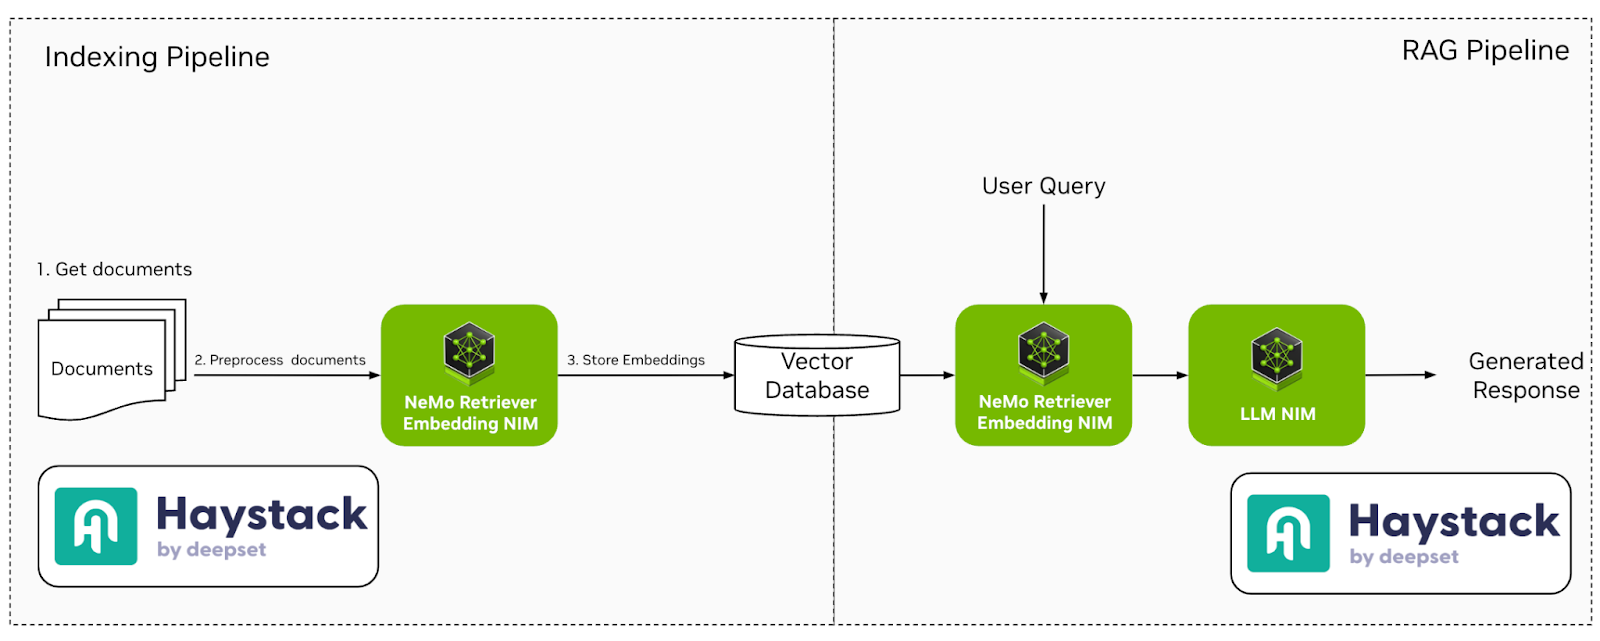
Fig. 1 - Haystack Indexing and RAG pipelines with NVIDIA NIMs
For this section, we have provided scripts and instructions for building a RAG pipeline leveraging NIMs hosted on the NVIDIA API catalog as part of the GitHub repository. We also provide a Jupyter Notebook for building the same RAG pipeline using NIMs deployed on your infrastructure in a Kubernetes environment.
Vectorize Documents with Haystack Indexing Pipelines
Our indexing pipeline implementation is available in the
indexing tutorial. Haystack provides several
preprocessing components for document cleaning, splitting,
embedders, as well as
converters extracting data from files in different formats. In this tutorial, we will store PDF files in a QdrantDocumentStore. NvidiaDocumentEmbedder is used to connect with NIMs hosted on the
NVIDIA API catalog. Below is an example of how to initialize the embedder component with the
snowflake/arctic-embed-l NIM hosted on the NVIDIA API catalog.
from haystack.utils.auth import Secret
from haystack_integrations.components.embedders.nvidia import NvidiaDocumentEmbedder


embedder = NvidiaDocumentEmbedder(model="snowflake/arctic-embed-l",
                                  api_url="https://ai.api.nvidia.com/v1/retrieval/snowflake/arctic-embed-l",
                                  batch_size=1)
Creating the Haystack RAG Pipeline
In our example, we will create a simple question/answering RAG pipeline using both NVIDIA NeMo Retriever Text Embedding NIM and LLM NIM. For this pipeline, we use the NvidiaTextEmbedder to embed the query for retrieval, and the NvidiaGenerator to generate a response. Example below shows how to instantiate the generator using
meta/llama3-70b-instruct LLM NIM hosted on the NVIDIA API catalog.
generator = NvidiaGenerator(
    model="meta/llama3-70b-instruct",
    api_url="https://integrate.api.nvidia.com/v1",
    model_arguments={
        "max_tokens": 1024
    }
)
We use Haystack pipelines to connect various components of this RAG pipeline including query embedders and LLM generators. Below is an example of a RAG pipeline:
from haystack import Pipeline
from haystack.utils.auth import Secret
from haystack.components.builders import PromptBuilder
from haystack_integrations.components.embedders.nvidia import NvidiaTextEmbedder
from haystack_integrations.components.generators.nvidia import NvidiaGenerator
from haystack_integrations.components.retrievers.qdrant import QdrantEmbeddingRetriever
from haystack_integrations.document_stores.qdrant import QdrantDocumentStore

document_store = QdrantDocumentStore(embedding_dim=1024, host="qdrant")

embedder = NvidiaTextEmbedder(model="snowflake/arctic-embed-l",
                                  api_key=Secret.from_env_var("NVIDIA_EMBEDDINGS_KEY"),
                                  api_url="https://ai.api.nvidia.com/v1/retrieval/snowflake/arctic-embed-l")

retriever = QdrantEmbeddingRetriever(document_store=document_store)

prompt = """Answer the question given the context.
Question: {{ query }}
Context:
{% for document in documents %}
    {{ document.content }}
{% endfor %}
Answer:"""
prompt_builder = PromptBuilder(template=prompt)

generator = NvidiaGenerator(
    model="meta/llama3-70b-instruct",
    api_url="https://integrate.api.nvidia.com/v1",
    model_arguments={
        "max_tokens": 1024
    }
)

rag = Pipeline()
rag.add_component("embedder", embedder)
rag.add_component("retriever", retriever)
rag.add_component("prompt", prompt_builder)
rag.add_component("generator", generator)

rag.connect("embedder.embedding", "retriever.query_embedding")
rag.connect("retriever.documents", "prompt.documents")
rag.connect("prompt", "generator")
Indexing Files and Deploying the Haystack RAG Pipeline
Hayhooks allows the deployment of RAG pipelines in a containerized environment. In our example, we have provided a
docker-compose file to setup both the Qdrant database, and the RAG pipeline. As we are leveraging NIMs hosted on the
NVIDIA API catalog, we need to set the API keys for the NIMs in the .env file. The instructions below expect NVIDIA_API_KEY (for NvidiaGenerator) and NVIDIA_EMBEDDINGS_KEY (for NvidiaDocumentEmbedder and NvidiaTextEmbedder).
Executing docker-compose up will launch 3 containers: qdrant, hayhooks and qdrant-setup (which will run our indexing pipeline and stop). The Qdrant database will be deployed on the localhost and exposed at port 6333. The Qdrant dashboard allows users to inspect the vectorized documents at
localhost:6333/dashboard.
Serializing Pipelines
Haystack pipelines defined in Python can be serialized to YAML by calling dump() on the pipeline object, as shown in our
RAG pipeline tutorial. The
YAML definition is as follows:
components:
  embedder:
    ...
    type: haystack_integrations.components.embedders.nvidia.text_embedder.NvidiaTextEmbedder
  generator:
    init_parameters:
      api_key:
        ...
    type: haystack_integrations.components.generators.nvidia.generator.NvidiaGenerator
  prompt:
    init_parameters:
      template: "Answer the question given the context.\nQuestion: {{ query }}\nContext:\n\
        {% for document in documents %}\n    {{ document.content }}\n{% endfor %}\n\
        Answer:"
    type: haystack.components.builders.prompt_builder.PromptBuilder
  retriever:
    init_parameters:
      document_store:
        init_parameters:
          ...
        type: haystack_integrations.document_stores.qdrant.document_store.QdrantDocumentStore
      ...
    type: haystack_integrations.components.retrievers.qdrant.retriever.QdrantEmbeddingRetriever

connections:
- receiver: retriever.query_embedding
  sender: embedder.embedding
- receiver: prompt.documents
  sender: retriever.documents
- receiver: generator.prompt
  sender: prompt.prompt
max_loops_allowed: 100
metadata: {}
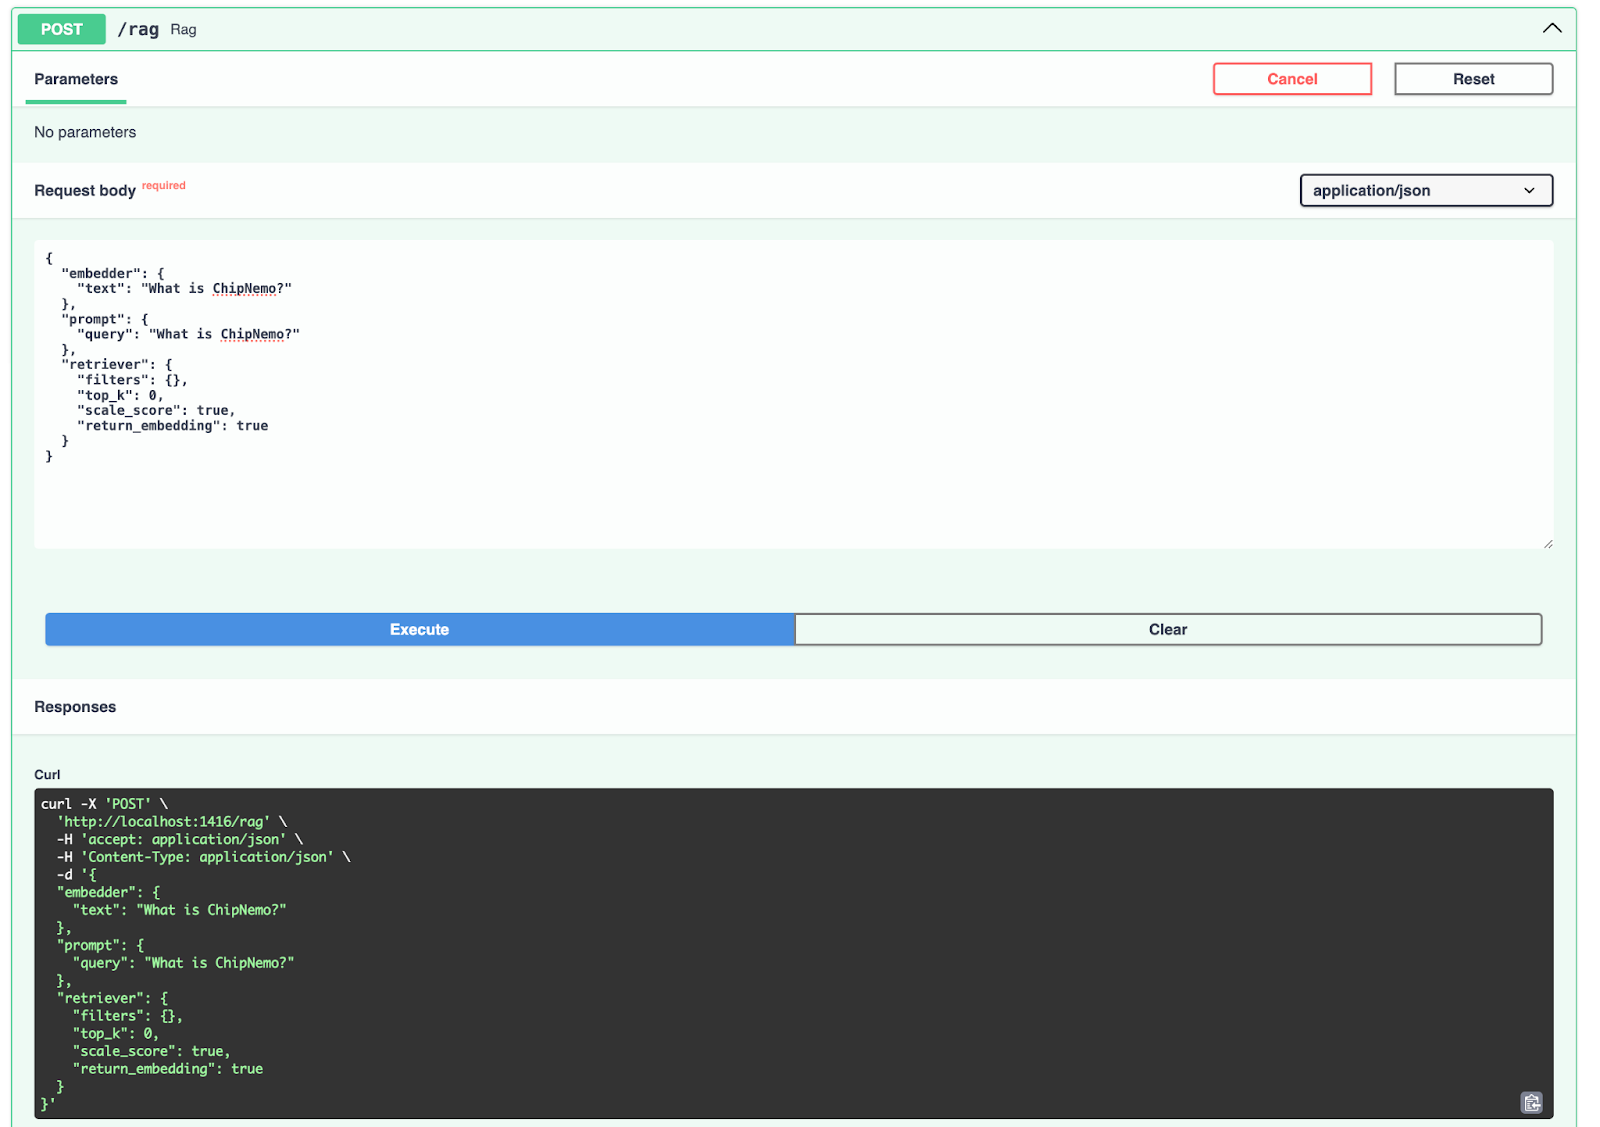
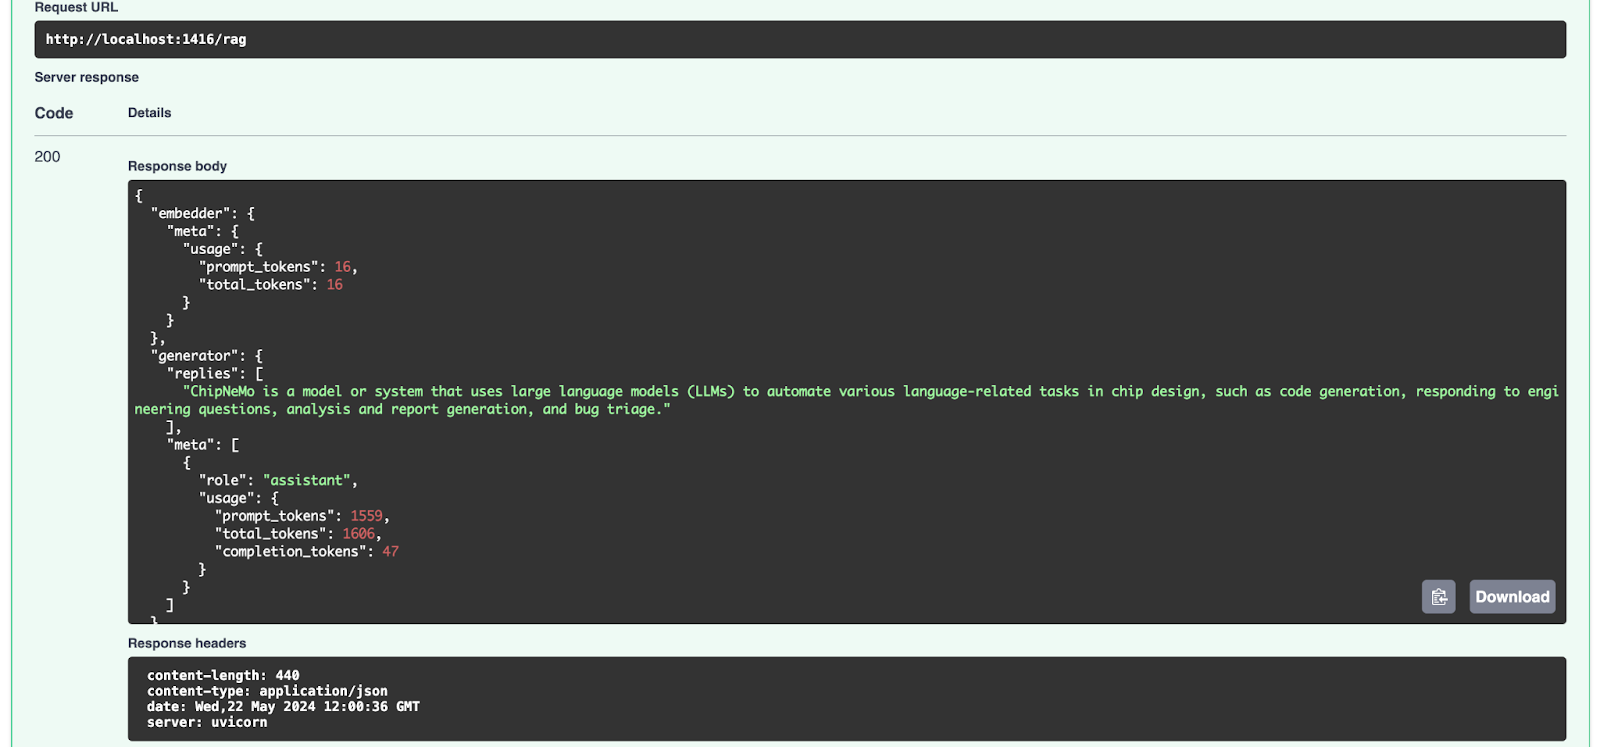
Deploy the RAG Pipeline
To deploy the RAG pipeline, execute hayhooks deploy rag.yaml which will expose the pipeline on
http://localhost:1416/rag by default. You can then visit
http://localhost:1416/docs for the API docs and try out the pipeline.
For production, Haystack provides Helm charts and instructions to create services running Hayhooks with a container orchestrator like Kubernetes.
In the next sections, we will show how to deploy, monitor and autoscale NIMs on your infrastructure in a Kubernetes environment for self-hosting AI foundation models. Finally, we will provide instructions on how to use them in the Haystack RAG pipeline.
Self-hosting NVIDIA NIMs on a Kubernetes cluster
Kubernetes Cluster Environment
In this tutorial, the setup environment consists of a DGX H100 with 8 H100 GPUs each having 80GB of memory as host and with Ubuntu as the operating system. Docker is used as the container runtime. Kubernetes is deployed on it using Minikube. To enable GPU utilization in Kubernetes, we install essential NVIDIA software components using the GPU Operator.
NVIDIA NIMs Deployment
As part of this setup, we deploy following NVIDIA NIMs into the Kubernetes cluster using Helm charts:
- The LLM NIM, which uses the model
llama3-8b-instruct - The NeMo Retriever Text Embedding NIM, which uses the model
nvidia/nv-embedqa-e5-v5
The Helm chart for the LLM NIM is located in GitHub whereas the helm chart for NVIDIA NeMo Retriever Embedding NIM can be fetched from the the NGC registry. Figure 3 illustrates the deployment of NIMs on a Kubernetes cluster running on a DGX H100. The GPU Operator components are deployed via its Helm chart and are part of the GPU Operator stack. Prometheus and Grafana are deployed via Helm charts for monitoring the Kubernetes cluster and the NIM.
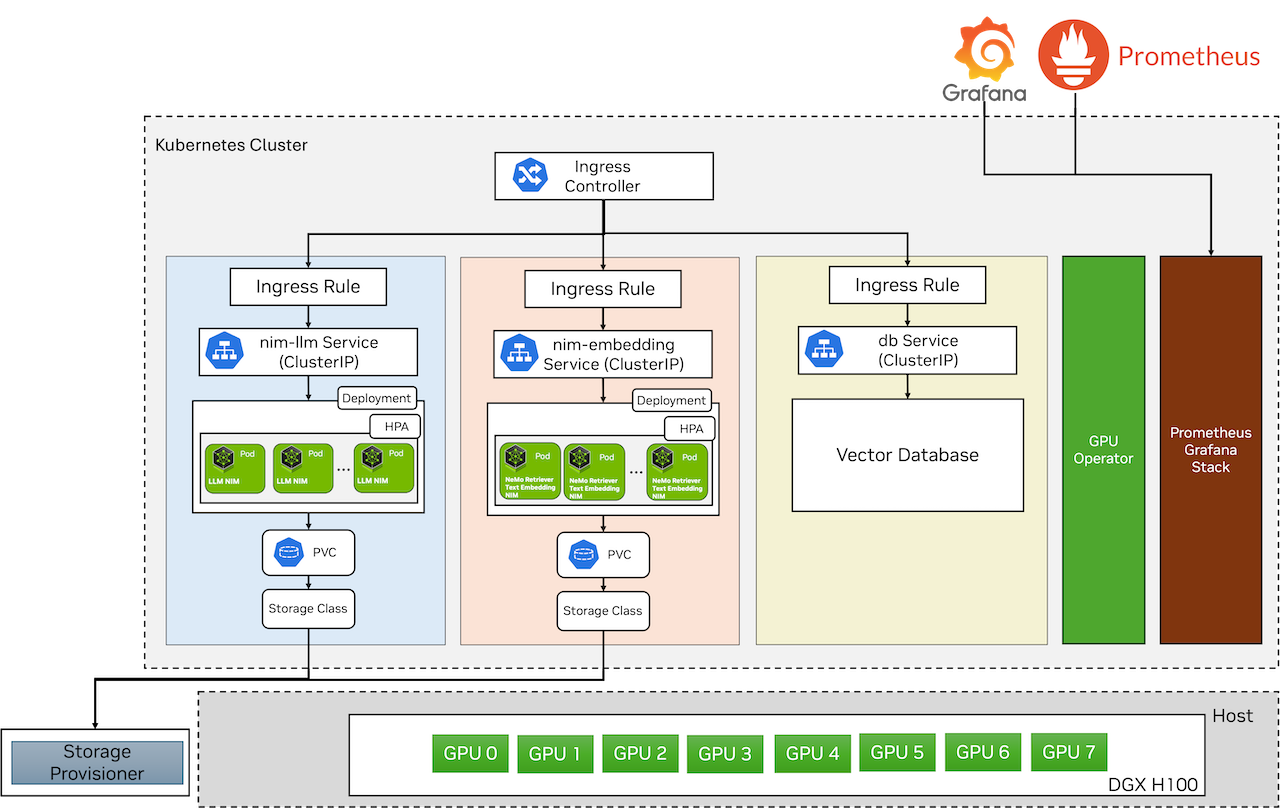
The LLM NIM Helm chart contains the LLM NIM container, which runs within a pod and references the model via
Persistent Volume (PV) and
Persistent Volume Claim (PVC). The LLM NIM pods are autoscaled using the
Horizontal Pod Autoscaler (HPA) based on custom metrics and are exposed via Kubernetes
ClusterIP service. To access the LLM NIM, we deploy an
ingress and expose it at the /llm endpoint.
Similarly, the NeMo Retriever Text Embedding NIM Helm chart includes the NeMo Retriever Text Embedding NIM container, which runs within a pod and references the model on the host via PV and PVC. The NeMo Retriever Text Embedding NIM pods are also autoscaled via HPA and are exposed via Kubernetes ClusterIP service. To access the NeMo Retriever Text Embedding NIM, we deploy an ingress and expose it at the /embedding endpoint.
Users and other applications can access the exposed NVIDIA NIMs via the ingress. The vector database Qdrant is deployed using this helm chart.
Now, let’s take a closer look at the deployment process for each NIM:
LLM NIM deployment
- Create the namespace, if it is not already created yet:
kubectl create namespace nim-llm
- Add a Docker registry secret that will be used for pulling NIM containers from NGC and replace
<ngc-cli-api-key>with the API key from NGC. Follow this link for generating an API key in NGC.
kubectl create secret -n nim-llm docker-registry nvcrimagepullsecret \
    --docker-server=nvcr.io \
    --docker-username='$oauthtoken' --docker-password=<ngc-cli-api-key>
- Create a generic secret
ngc-api, which is used to pull the model within the NIM container.
kubectl create secret -n nim-llm generic ngc-api \
    --from-literal=NGC_CLI_API_KEY=<ngc-cli-api-key>
- Create
nim-llm-values.yamlfile with the below content. Adjustrepositoryandtagvalues depending on your environment.
image:
  # Adjust to the actual location of the image and version you want
  repository: nvcr.io/nim/meta/llama3-8b-instruct
  tag: 1.0.0
imagePullSecrets:
  - name: nvcrimagepullsecret
model:
  name: meta/llama3-8b-instruct
  ngcAPISecret: ngc-api
persistence:
  enabled: true
  size: 30Gi
  annotations:
    helm.sh/resource-policy: keep
statefulSet:
    enabled: false
resources:
  limits:
    nvidia.com/gpu: 1
- We assume that the helm chart for the LLM NIM is located here:
./nims/helm/nim-llm/. You can change the command accordingly depending on where the helm chart is located. Deploy the LLM NIM by running the following command:
helm -n nim-llm install nim-llm -f ./nims/helm/nim-llm/ nim-llm-values.yaml
- The deployment takes a few minutes to start the containers, download models, and become ready. You can monitor the pods with the below command:
kubectl get pods -n nim-llm
Example Output
NAME        READY   STATUS    RESTARTS   AGE
nim-llm-0   1/1     Running   0          8m21s
- Install an
ingress controller, if it has not been installed already. Then, create a file
ingress-nim-llm.yamlwith the below content to create the ingress for the LLM NIM. Make sure to change the host (here nims.example.com) with your fully qualified domain name.
apiVersion: networking.k8s.io/v1
kind: Ingress
metadata:
  name: nim-llm-ingress
  namespace: nim-llm
  annotations:
    nginx.ingress.kubernetes.io/use-regex: "true"
    nginx.ingress.kubernetes.io/rewrite-target: /$2
spec:
  rules:
    - host: nims.example.com
      http:
        paths:
          - path: /llm(/|$)(.*)
            pathType: ImplementationSpecific
            backend:
              service:
                name: nim-llm
                port:
                  number: 8000
Deploy the ingress with the below command:
kubectl apply -f ingress-nim-llm.yaml
- Access the exposed service by making a curl request for testing (replace
nims.example.comwith you own fully qualified domain name)
curl -X 'POST' 'http://nims.example.com/llm/v1/chat/completions' \
  -H 'accept: application/json' \
  -H 'Content-Type: application/json' \
  -d '{
  "messages": [
    {
      "content": "You are a polite and respectful chatbot helping people plan a vacation.",
      "role": "system"
    },
    {
      "content": "What shall i do in France in one line?",
      "role": "user"
    }
  ],
  "model": "meta/llama3-8b-instruct",
  "temperature": 0.5,
  "max_tokens": 1024,
  "top_p": 1,
  "stream": false
}'
Example output:
{
  "id": "cmpl-44c301e7f12942fb830fc53a58e98e2a",
  "object": "chat.completion",
  "created": 1724399020,
  "model": "meta/llama3-8b-instruct",
  "choices": [
    {
      "index": 0,
      "message": {
        "role": "assistant",
        "content": "Indulge in the rich culture and history of France by visiting iconic landmarks like the Eiffel Tower, Notre-Dame Cathedral, and the Louvre Museum, and savor the country's renowned cuisine and wine in charming cities like Paris, Lyon, and Bordeaux."
      },
      "logprobs": null,
      "finish_reason": "stop",
      "stop_reason": 128009
    }
  ],
  "usage": {
    "prompt_tokens": 39,
    "total_tokens": 94,
    "completion_tokens": 55
  }
}
Now, we have the LLM NIM up and running.
NeMo Retriever Text Embedding NIM deployment
The deployment of the NeMo Retriever Text Embedding NIM is similar to the LLM NIM.
-
Follow steps 1 - 3 as LLM NIM deployment but replace namespace with
nim-embeddingin the commands. -
Create
nim-embedding-values.yamlfile with the below content. Adjustrepositoryandtagvalues depending on your environment.
image:
  repository: nvcr.io/nim/nvidia/nv-embedqa-e5-v5
  tag: 1.0.0
  pullPolicy: IfNotPresent
resources:
  limits:
    ephemeral-storage: 30Gi
    nvidia.com/gpu: 1
    memory: 12Gi
    cpu: "16000m"
  requests:
    ephemeral-storage: 3Gi
    nvidia.com/gpu: 1
    memory: 8Gi
    cpu: "4000m"
metrics:
  enabled: true
- Fetch the NeMo Retriever Text Embedding NIM Helm chart, by running following commands (you would need to create NGC CLI API key, check here on how to create it):
helm fetch https://helm.ngc.nvidia.com/nim/nvidia/charts/text-embedding-nim-1.0.0.tgz --username='$oauthtoken' --password=<NGC_CLI_API_KEY>
- We assume that the helm chart for the NeMo Retriever Text Embedding NIM is located here:
./nims/helm/nim-embedding/. You can change the command accordingly depending on where the helm chart is located. Deploy the NeMo Retriever Text Embedding NIM by running the following command
helm -n nim-embedding install nim-embedding -f embedding-nim-values.yaml /nims/helm/nim-embedding/text-embedding-nim-1.0.0.tgz
- The deployment takes a few minutes to start the container, download model, and become ready. You can monitor the pod with the below command:
kubectl get pods -n nim-embedding
Example Output
NAME                                 READY   STATUS     RESTARTS   AGE
nemo-embedding-ms-58dd974469-tpdvn   1/1     Running   0          5m
- Create a file
ingress-nim-embedding.yamlsimilar to the LLM NIM ingress with service namenemo-embedding-ms, port8080, and path/embedding(/|$)(.*)as below:
apiVersion: networking.k8s.io/v1
kind: Ingress
metadata:
  name: nim-embedding-ingress
  namespace: nim-embedding
  annotations:
    nginx.ingress.kubernetes.io/use-regex: "true"
    nginx.ingress.kubernetes.io/rewrite-target: /$2
spec:
  rules:
    - host: nims.example.com
      http:
        paths:
          - path: /embedding(/|$)(.*)
            pathType: ImplementationSpecific
            backend:
              service:
                name: nemo-embedding-ms
                port:
                  number: 8080
- Access the exposed service by making a curl request for testing (replace in below the
nims.example.comwith your fully qualified domain name).
curl 'GET' \
  'http://nims.example.com/embedding/v1/models' \
  -H 'accept: application/json'
Example output:
{
  "object": "list",
  "data": [
    {
      "id": "nvidia/nv-embedqa-e5-v5",
      "created": 0,
      "object": "model",
      "owned_by": "organization-owner"
    }
  ]
}
7 You can test the NeMo Retriever Text Embedding NIM by creating embeddings for sample text as below:
curl -X "POST" \
  "http://nims.example.com/embedding/v1/embeddings" \
  -H 'accept: application/json' \
  -H 'Content-Type: application/json' \
  -d '{
"input": ["Hello world"],
"model": "nvidia/nv-embedqa-e5-v5",
"input_type": "query"
}'
Example output:
{
  "object": "list",
  "data": [
    {
      "index": 0,
      "embedding": [
        -0.0003485679626464844,
        -0.017822265625,
        0.0262298583984375,
        0.0222015380859375,
        ...
        -0.00823974609375
      ],
      "object": "embedding"
    }
  ],
  "model": "nvidia/nv-embedqa-e5-v5",
  "usage": {
    "prompt_tokens": 6,
    "total_tokens": 6
  }
}
Now, we have the NeMo Retriever Text Embedding NIM up and running.
Once the above procedure is completed, you will have API endpoints of LLM NIM and NeMo Retriever Text Embedding NIM.
Operational Considerations
Monitoring and autoscaling are essential for deployed NVIDIA NIMs to ensure efficient, effective, and reliable operation. Monitoring tracks performance metrics, detects errors, and optimizes resource utilization, while autoscaling dynamically adjusts resources to match changing workloads, ensuring the NVIDIA NIMs can handle sudden spikes or dips in demand. This enable NVIDIA NIMs to provide accurate and timely responses, even under heavy loads, while optimizing costs and maintaining high availability. In this section, we will delve into details of deploying monitoring and enabling autoscaling for NVIDIA NIMs.
Monitoring
NVIDIA NIM metrics are collected with the open-source tool Prometheus and visualized with the Grafana dashboards. NVIDIA dcgm-exporter is the preferred tool to collect GPU telemetry. We follow the instructions from here for the deployment of Prometheus and Grafana.
Visualizing NVIDIA NIM Metrics
LLM NIM
By default, NVIDIA LLM NIM metrics are exposed at http://localhost:8000/metrics by the LLM NIM container. All the exposed metrics are listed here. Using a Prometheus ServiceMonitor they can be published to Prometheus and be viewed in the Grafana. The Prometheus ServiceMonitor is used to define application to scrape metrics from within Kubernetes cluster.
- Create a file
service-monitor-nim-llm.yamlwith the below content.
apiVersion: monitoring.coreos.com/v1
kind: ServiceMonitor
metadata:
  name: nim-llm-sm
  namespace: nim-llm
spec:
  endpoints:
  - interval: 30s
    targetPort: 8000
    path: /metrics
  namespaceSelector:
    matchNames:
    - nim-llm
  selector:
    matchLabels:
      app.kubernetes.io/name: nim-llm
- Create a Prometheus ServiceMonitor using the below command:
kubectl apply -f service-monitor-nim-llm.yaml
In the prometheus UI under Status -> Targets, you will see the below ServiceMonitor once it’s deployed.

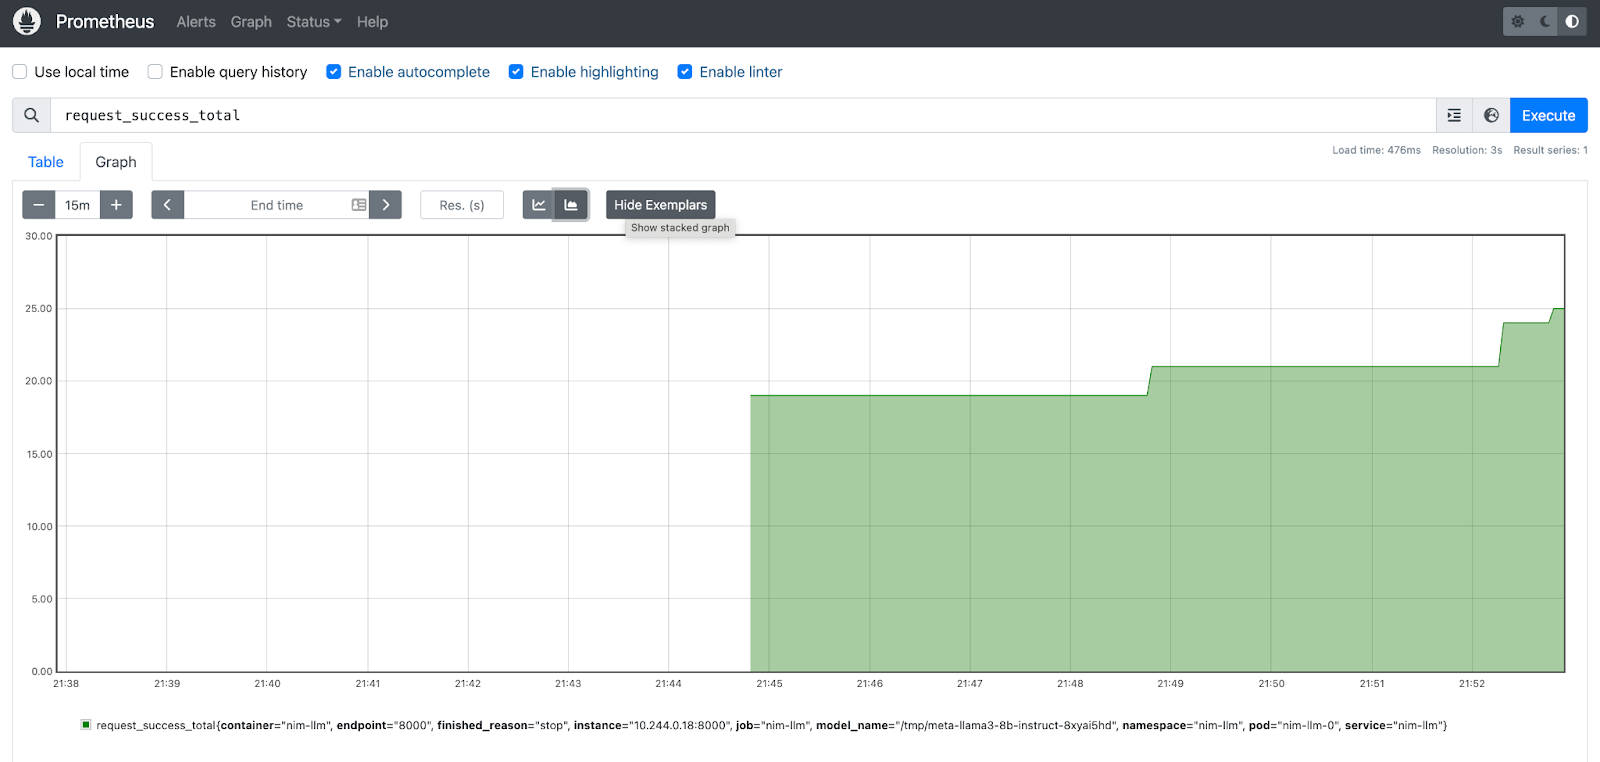
- Let’s check some inference metrics on the Prometheus UI. Figure 4 shows the stacked graph for
request_success_totalNIM metric.
NeMo Retriever Text Embedding NIM
NeMo Retriever Text Embedding NIM exposes underlying Triton metrics on port 8002. All the exposed metrics are listed here. We will create a service monitor to expose these metrics so as to publish them in Prometheus and visualize in Grafana.
- Create a file
service-monitor-nim-embedding.yamlwith the below content.
apiVersion: monitoring.coreos.com/v1
kind: ServiceMonitor
metadata:
  name: nim-embedding-sm
  namespace: nim-embedding
spec:
  endpoints:
  - interval: 30s
    targetPort: 8002
    path: /metrics
  namespaceSelector:
    matchNames:
    - nim-embedding
  selector:
    matchLabels:
      app.kubernetes.io/name: text-embedding-nim
- Create a Prometheus ServiceMonitor using the below command:
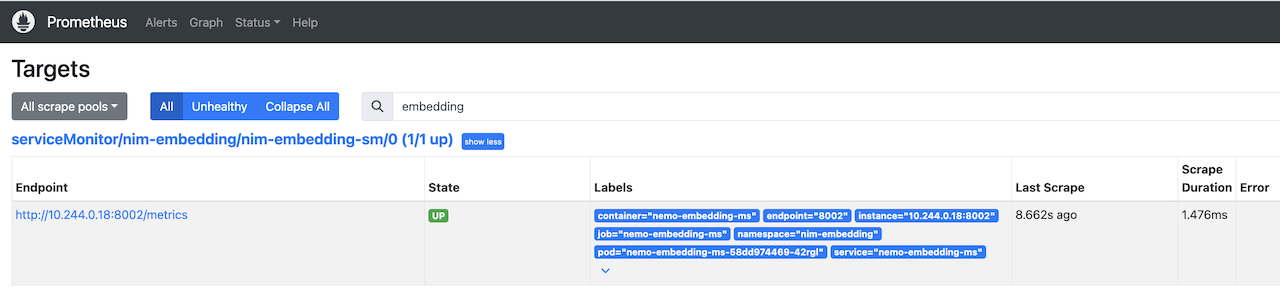
kubectl apply -f service-monitor-nim-embedding.yaml
In the prometheus UI under Status -> Targets, you will see the below ServiceMonitor once it’s deployed.
- We can check some triton metrics on the Prometheus UI. Figure 5 shows the stacked graph for
nv_inference_countmetric.

Autoscaling NVIDIA NIM
In this tutorial, we use the Kubernetes Horizontal Pod Autoscaler - HPA to adjust the scaling of the NIM pods. We have defined custom metrics to monitor the average GPU usage of each NVIDIA NIM and used by the Horizontal Pod Autoscaler (HPA) to dynamically adjust the number of NIM pods. See the metric definition below:
| Metrics | Expressions |
|---|---|
| nim_llm_gpu_avg | avg by (kubernetes_node, pod, namespace, gpu) (DCGM_FI_DEV_GPU_UTIL{pod=~"nim-llm-.*"}) |
| nim_embedding_gpu_avg | avg by (kubernetes_node, pod, namespace, gpu) (DCGM_FI_DEV_GPU_UTIL{pod=~"nemo-embedding-ms-.*"}) |
These metrics are example metrics and one should adjust them based on their environment.
Let’s deploy the HPA.
- Create a file with the name
prometheus_rule_nims.yamlwith the below content to create the prometheus rules for the above custom metric. Adjust the labels (app, other prometheus labels) according to the current deployed prometheus instance.
apiVersion: monitoring.coreos.com/v1
kind: PrometheusRule
metadata:
  labels:
    app: kube-prometheus-stack
    app.kubernetes.io/instance: kube-prometheus-stack-1710254997
    app.kubernetes.io/managed-by: Helm
    app.kubernetes.io/part-of: kube-prometheus-stack
    app.kubernetes.io/version: 56.8.2
    chart: kube-prometheus-stack-56.8.2
    heritage: Helm
    release: kube-prometheus-stack-1710254997
  name: kube-prometheus-stack-1709-gpu.rules
  namespace: prometheus
spec:
  groups:
  - name: gpu.rules
    rules:
    - expr: avg by (kubernetes_node, pod, namespace, gpu) (DCGM_FI_DEV_GPU_UTIL{pod=~"nim-llm-.*"})
      record: nim_llm_gpu_avg
    - expr: avg by (kubernetes_node, pod, namespace, gpu) (DCGM_FI_DEV_GPU_UTIL{pod=~"nemo-embedding-ms-.*"})
      record: nim_embedding_gpu_avg
- Create custom prometheus recording rules by running the below command:
kubectl apply -f prometheus_rule_nims.yaml
- In prometheus UI, under
Status -> Rules, you can see the above two created rules as shown in Figure 6.

- Install
prometheus-adapter to query the custom metrics based on the custom recording rules created above and register them to the custom metrics API for HPA to fetch. Replace in below command
<prometheus-service-name>with the name of the prometheus service in Kubernetes.
helm upgrade --install prometheus-adapter prometheus-community/prometheus-adapter --set prometheus.url="http://<prometheus-service-name>.prometheus.svc.cluster.local"
- Query the custom metrics API to see if the metrics have been registered using the below command:
kubectl get --raw /apis/custom.metrics.k8s.io/v1beta1 | jq -r . | grep llms
Example Output:
"name": "pods/nim_embedding_gpu_avg",
"name": "namespaces/nim_embedding_gpu_avg",
"name": "pods/nim_llm_gpu_avg",
"name": "namespaces/nim_llm_gpu_avg",
- A separate HPA definition is created for the two NVIDIA NIMs. Within this definition, we specify the minimum and maximum number of replicas, the metric to monitor, and the target value for that metric. Below is the definition for the LLM NIM HPA and you can create the similar for the NeMo Retriever Text Embedding NIM using
nim_embedding_gpu_avgmetric.
LLM NIM HPA file:
apiVersion: autoscaling/v2
kind: HorizontalPodAutoscaler
metadata:
  name: nim-llm-hpa
  namespace: nim-llm
spec:
  scaleTargetRef:
    apiVersion: apps/v1
    kind: Deployment
    name: nim-llm
  minReplicas: 1
  maxReplicas: 2
  metrics:
    - type: Pods
      pods:
        metric:
          name: nim_llm_gpu_avg
        target:
          type: AverageValue
          averageValue: 30
- Create the two HPAs using the below commands:
kubectl apply -f hpa_nim_llm.yaml
kubectl apply -f hpa_nim_embedding.yaml
- Check the status of HPAs:
kubectl get hpa -A
Example Output:
NAMESPACE       NAME                REFERENCE                      TARGETS        MINPODS   MAXPODS   REPLICAS   AGE
nim-embedding   nim-embedding-hpa   Deployment/nemo-embedding-ms   0/30           1         2         1          80s
nim-llm         nim-llm-hpa         Deployment/nim-llm             0/30           1         2         1          2m11s
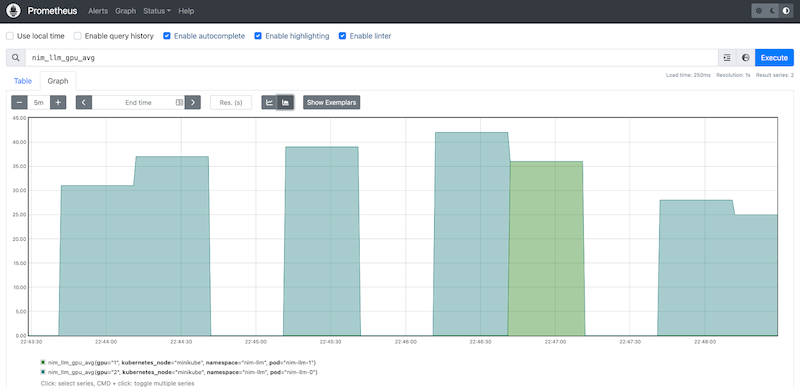
- Send some requests to LLM NIM and see the LLM NIM pod getting scaled as shown below:
NAME        READY   STATUS    RESTARTS   AGE
nim-llm-0   1/1     Running   0          3h47m
nim-llm-1   1/1     Running   0          3m30s
Also, Figure 6 shows the prometheus graph showing the scaling of LLM NIM.
We have now deployed NVIDIA NIMs on your infrastructure in a scalable fashion. We can now use them in the RAG pipeline. The next section provides the details for the same.
Use Self-hosted NVIDIA NIMs in the RAG Pipeline
This section provides instructions to use previously deployed NVIDIA NIMs on your infrastructure in a Kubernetes cluster for NvidiaTextEmbedder, NvidiaDocumentEmbedder and NvidiaGenerator in the Haystack RAG pipeline, replacing <self-hosted-emedding-nim-url> with the endpoint of the NeMo Retriever Text Embedding NIM and <self-hosted-llm-nim-url> with the LLM NIM. The provided
notebook in the repository has examples of how to use the self-hosted NVIDIA NIMs.
NvidiaDocumentEmbedder:
embedder = NvidiaDocumentEmbedder(
    model=embedding_nim_model,
    api_url="http://<self-hosted-emedding-nim-url>/v1"
)
NvidiaTextEmbedder:
# initialize NvidiaTextEmbedder with the self-hosted NeMo Retriever Text Embedding NIM URL
embedder = NvidiaTextEmbedder(
    model=embedding_nim_model,
    api_url="http://<self-hosted-embedding-nim-url>/v1"
)
NvidiaGenerator:
# initialize NvidiaGenerator with the self-hosted LLM NIM URL
generator = NvidiaGenerator(
    model=llm_nim_model_name,
    api_url="http://<self-hosted-llm-nim-url>/v1",
    model_arguments={
        "temperature": 0.5,
        "top_p": 0.7,
        "max_tokens": 2048,
    },
)
Summary
In this blog, we provide a comprehensive walkthrough for building robust and scalable RAG applications using Haystack and NVIDIA NIMs. We cover building the RAG pipeline by leveraging NVIDIA NIMs hosted on the NVIDIA API catalog and also using self-hosted NVIDIA NIMs deployed on your infrastructure in a Kubernetes environment. Our step-by-step instructions detail how to deploy NVIDIA NIMs in a Kubernetes cluster, monitor their performance, and scale them as needed.
By leveraging proven deployment patterns, our architecture ensures a responsive user experience and predictable query times, even in the face of high or bursty user queries and document indexing workloads. Moreover, our deployment recipe is flexible, allowing for easy implementation in cloud, on-premise, or air-gapped environments. With this guide, we aim to provide a resource for anyone looking to build reliable and performant RAG applications at scale.